Showing posts with label codes. Show all posts

Tuesday, December 25, 2012

Task Killer Script For Android Mobile Phones Free Download

Recently Launched Xperia tipo (ST21i2) With Android 4.0.4 operating system its MRP Rs. 10,999 Its best Buy Rs. 9700. Every One Want run her/his mobile phone fast and easy to use. Mobile phone Work better when extra application are close properly. Here i share with you a tricks to close your un-used application to get your android run faster. Recently I share with you Android Jelly Bean Theme  Pack For Ice cream Sandwich And GingerBread Operating system. Now I Share this with you.

Read Also

This Script Is Working On [SCRIPT]eXperia Terminator For P/S/U/Acro/Sola/Go/Tipo

HOW TO WORK?

This a simple Script which terminates you android mobile apps in background. You No need Any task managers or task killers.

Instructions :

*Boot into CWM
*Mount system(DO NOT IGNORE)
*Flash the downloaded zip
Type this in any terminal emulator

Code:

su
terminate
Task Killer Script For Android Mobile Phones Free Download eXperia Terminator For P/S/U/Acro/Sola/Go/Tipo
Download  Mirror1 ||  Mirror2

Author:Jatin Baliyan is founder and webmaster of Arenamazza.org. You can follow me on TwitterFacebook and on Google Plus..


Friday, December 7, 2012

Updated Latest facebook chat code : Facebook Chat Window Tips and Tricks code

Updated Latest facebook chat Window code Are Here These Code is Prefectly Working on your facebook chat window how to use facebook chat code : just copy any code and Paste it in friends chat window which friends you want to share this Latest facebook Emoticons Posted Soon with your keep Regular visit... Last Time I Share with you how to update your status in Blue Color..

Read Also: 

Some old And Work Facebook window chat code
De Niro You Talking To Me
You talkin' to me?
Copy the emoticon code to facebook chat:


Bullet holes chat code
Bullet holes
Copy the emoticon code to facebook chat:


WTF Facebook Chat Emoticon
WTF Emoticon
Copy the emoticon code to facebook chat:


So What facebook emoticon
So What
Copy the emoticon code to facebook chat:


Keep Calm And Gangnam Sytle Picture Symbol For Facebook Chat
Keep Calm And Gangnam Style
Copy the emoticon code to facebook chat:


Dr House lupus emoticon
Dr. House
Copy the emoticon code to facebook chat:

Jim Morrison Stencil Emoticon
Jim Morrison
Copy the emoticon code to facebook chat:


Bob Marley Emoticon Drawing
Bob Marley
Copy the emoticon code to facebook chat:


Sparrow Depp
Captain Sparrow (Johnny Depp)
Copy the emoticon code to facebook chat:


Gotye feat. Kimbra drawing for facebook chat
Gotye & Kimbra Emoticon
Copy the emoticon code to facebook chat:


Good Night Sweet Dreams Emoticon
Good Night, Sweet Dreams
Copy the emoticon code to facebook chat:


Talk to the hand
Talk to the hand
Copy the emoticon code to facebook chat:


Beautiful Inside and out
Beautiful inside and out
Copy the emoticon code to facebook chat:


Thank You Emoticon Clip Art For Facebook
Thank You Emoticon
Copy the emoticon code to facebook chat:


Peace Sign Facebook Emoticon
Peace Sign
Copy the emoticon code to facebook chat:


Facebok Butterflies Emoticon
Releasing Butterflies
Copy the emoticon code to facebook chat:


Author:Jatin Baliyan is founder and webmaster of Arenamzza.org. You can follow me on TwitterFacebook and on Google Plus..


Wednesday, November 14, 2012

Javascript and html code site search code for web and internal site html code

Hello Friends I share  tool this for anyone that wants to add search functionality to their website, but does not have the technical background to do so. It utilizes Google to do the "heavy lifting", so you do not need a database on your server or run processes to keep your site indexed. So basically, if your site is in Google's index, it will work for you.

 i will give you some searching codes in these you can also get web and site search submit button google logo only site seach just use these code on your html sites

<iframe style="width:220px; height:70px; margin:5px;" frameborder=0 allowtransparency=yes scrolling=no src="http://search.digitalpoint.com/iframe.php?site=www.arenamazza.org"></iframe>
                                                                                        LOok LIKe THIS
This Code Search engine like this   ====>>
Just Change The site Name And you Can also change width:220px and height:70px


2.

<iframe style="width:300px; height:70px; margin:5px;" frameborder=0 allowtransparency=yes scrolling=no src="http://search.digitalpoint.com/iframe.php?site=www.arenamazza.org&b=1"></iframe>
                                                                                    LOok LIKe THIS
This Code Search engine like this   ====>>
Just Change The site Name And you Can also change width:220px and height:70px
&b=1 this is the submit button you can add or remove this 

3.

                                                                                                                            <iframe style="width:375px; height:70px; margin:5px;" frameborder=0 allowtransparency=yes scrolling=no src="http://search.digitalpoint.com/iframe.php?site=www.arenamazza.org&b=1&l=1"></iframe>
                                                                                      LOok LIKe THIS
This Code Search engine like this   ====>>
Just Change The site Name And you Can also change width:220px and height:70px
&l=1 this is the logo of google If You Remove this just remove that code


4.

<iframe style="width:375px; height:35px; margin:5px;" frameborder=0 allowtransparency=yes scrolling=no src="http://search.digitalpoint.com/iframe.php?site=www.arenamazza.org&b=1&l=1&y=1"></iframe>
                                                                                      LOok LIKe THIS
This Code Search engine like this   ====>>
Just Change The site Name And you Can also change width:220px and height:70px
&y=1  Its a only site search and you can also remove google logo by removing this code &l=1


Monday, October 29, 2012

How To Adding Paypal Donation Button to Blogger : Html Code For Paypal Buttom


There are different plugins to easily add paypal donations to your blog if you’re on WordPress but the case is different with Blogger. I had this problem while I was on Blogger platform because every tutorial I read on adding paypal donations to my blog never worked. I read that I needed to generate the code from my paypal account by going Merchant Services. The truth is I never found any option to create a donation button under merchant services. I’m not sure if it was a perculiar problem with my paypal account or it’s perculiar to my selected country of residence during paypal registration.
However, I devised an alternative way to add paypal donations to your blog. This is for for those who can’t find the option to create a donation button directly from their paypal accounts. I took some time to know how this WordPress plugin works and finally used it successfully on a blogspot site. If you’re thinking whether you actually need a donation button on your site, it’s not necessary if you think it’s not but you may be underestimating the generosity of a happy reader. Don’t expect to get thousands of dollars from the button, maybe just a couple of bucks to grab a cup of coffee, who knows? 
how to add paypal donation button to blogger
First, you must log in to your paypal account and upgrade your account from personal to business if you haven’t. Only business accounts are allowed to receive donations and upgrading costs you nothing.
Adding this button to your blog isn’t that hard and doesn’t require much coding.
Adding the Paypal Donation Button to Blog’s Sidebar
1. If you’re using the old blogger interface interface, go to Design but you only need to go toLayout if you’ve updated to the new interface.
2. Depending on where you want the widget to appear, select Add a Widget
3. Choose HTML/JavaScript and paste this code inside the content area:
<!– Begin PayPal Donations by www.doncaprio.com –>
<div align="center"><form method="post" action="https://www.paypal.com/cgi-bin/webscr"><div class="paypal-donations"><input type="hidden" value="_donations" name="cmd"/><input type="hidden" value="
you@paypal.com" name="business"/><input type="hidden" value="http://www.arenamazza.org" name="return"/><input type="hidden" value="You found the information helpful and want to say thanks? Your donation is enough to inspire us to do more. Thanks a bunch!" name="item_name"/><input type="hidden" value="USD" name="currency_code"/><input type="image" alt="PayPal – The safer, easier way to pay online." name="submit" src="https://www.paypal.com/en_US/i/btn/btn_donateCC_LG.gif"/><img width="1" height="1" src="https://www.paypal.com/en_US/i/scr/pixel.gif" alt=""/></div></form></div>
<!– End PayPal Donations –>
4. Now save your template and view your blog, the donation button should be right there.
Adding the Paypal Donation Button Below Each Blog Post
1. If you’re using the old interface, go to Design > Edit HTML but you should go to Template > Edit HTML using the new blogger version.
2. Check the box labelled Expand Template Widget
3. Search for <data:post.body/>
4. Right below this, past that same code in the first method
5. Save your template
Note: You can change a couple of things in the code to customize it.
1. you@paypal.com – Change this to your own paypal email address. To avaoid bots picking up your email address, you can use your merchant ID instead here. To get your merchant ID, you can follow this link – https://www.paypal.com/webapps/customerprofile/summary.view.
2. http://www.arenamazza.org – Change this to your return page. You can create a “Thank You” page a donator will be redirected to after making the donation or use your blog’s homepage.
3. You found the information helpful and want to say thanks? Your donation is enough to inspire us to do more. Thanks a bunch! – You can change this to your custom text that will be displayed on the donation page.
4. https://www.paypal.com/en_US/i/btn/btn_donateCC_LG.gif – This is optional but you can change the URL to your own custom donation image.

Saturday, October 27, 2012

How to Lock Folder Without Any Software : pC data Security Without Any Software


There are lot of ways to lock folders on computer,But in this post we sharing, How to hide folder / Lock Folder

without any software. Just go through this post to know about that.This trick works in windows xp,vista and windows 7.

How to Lock Folder using notepad

1.    Open Notepad [Start-->Run-->Notepad  OR Open Notpad].

2.    Copy the below code and Paste it in notepad.

cls 
:End 
@ECHO OFF 
title Folder Locker 
if EXIST "Control Panel.{21EC2020-3AEA-1069-A2DD-08002B30309D}" goto UNLOCK 
if NOT EXIST Locker goto MDLOCKER 
:CONFIRM 
echo Are you sure u want to Lock the folder(Y/N) 
set/p "cho=>" 
if %cho%==Y goto LOCK 
if %cho%==y goto LOCK 
if %cho%==n goto END 
if %cho%==N goto END 
echo Invalid choice. 
goto CONFIRM 
:LOCK 
ren Locker "Control Panel.{21EC2020-3AEA-1069-A2DD-08002B30309D}" 
attrib +h +s "Control Panel.{21EC2020-3AEA-1069-A2DD-08002B30309D}" 
echo Folder locked 
goto End 
:UNLOCK 
echo Enter password to Unlock folder 
set/p "pass=>" 
if NOT %pass%==12345678 goto FAIL 
attrib -h -s "Control Panel.{21EC2020-3AEA-1069-A2DD-08002B30309D}" 
ren "Control Panel.{21EC2020-3AEA-1069-A2DD-08002B30309D}" Locker 
echo Folder Unlocked successfully 
goto End 
:FAIL 
echo Invalid password 
goto end 
:MDLOCKER 
md Locker 
echo Locker created successfully 
goto End  


Default Password Is
In the above batch code we added password is 12345678, and you can change that password.

3.    Now save the notepad file as locker.bat

Note : 1st Click on the bat file and lock to yes and then Unlock and your Folder is created where you save your data

4.    Now a batch file will created in where you saved location.

5.    Double Click on locker.bat file and you will see a Locker Folder at the same location where your      
       locker.bat file is saved.

6.    Double click on that Locker folder and store your personal data in it.
How to Lock Folder Without Any Software : pC data Security Without Any Software working all operating system without window 8

7.    After storing all your data in that folder again double click on locker.bat file and press Y there to Lock the folder and press Enter.

8.  The folder will be locked.

9.    To open this folder just double click the .bat file, the system will ask to enter the password. Just enter your password and Press Enter. The folder will be unlocked.

So this is very simple trick to hide or lock the files in window XP or window 7. Just you have to be careful that nobody can access the .bat file generated and can know your password.

Thursday, October 25, 2012

How To Embed URL,HTML,Forum Links Code below Blogger Posts : web designing tips and javascript code

This tutorial will explain how to create a widget, for your visitors to link back to your article/blogger post.This was created by me (http://www.arenamazza.org/) and previously I had installed this widget to this site.Many visitors ask from me how to add this widget to their blogger blogs and so I decided to explain it.This widget will show 3 codes (Blog Post URL,HTML code to embed your post to a website,Forum Link to embed your post to a forum) below your blogger post.If you like to add this widget to your blogger blog,then follow the steps given below.
1.Login to your blogger dashboard--> layout- -> Edit HTML
2.Scroll down to where you see </head> tag .
3.Copy below code and paste it just before the </head> tag .

<style type='text/css'>
.about-article{
background-color:#f9f9f9;
padding-bottom:5px;
padding-left:20px;
font-size:11px;
}
.about-article input{
background-color:#ffffff;
}
</style>
4.Now find below code:
<data:post.body/>
5.Copy below code and paste it just after the <data:post.body/>.
<b:if cond='data:blog.pageType == &quot;item&quot;'>
&lt;div class=&quot;about-article&quot;&gt;<p>If you find this article useful, please feel free to link to this page from your website or blog.</p>&lt;p class=&quot;noborder&quot;&gt;&lt;label for=&quot;aa-url&quot;&gt;URL:&lt;/label&gt;&lt;br /&gt;&lt;input size=&quot;80&quot; readonly=&quot;readonly&quot; onclick=&quot;this.focus();this.select();&quot; type=&quot;text&quot; id=&quot;aa-url&quot; value=&quot;<data:post.url/>&quot; /&gt;&lt;/p&gt;&lt;p&gt;&lt;label for=&quot;aa-forum&quot;&gt;HTML Link:&lt;/label&gt;&lt;br /&gt;&lt;input size=&quot;80&quot; readonly=&quot;readonly&quot; onclick=&quot;this.focus();this.select();&quot; type=&quot;text&quot; id=&quot;aa-forum&quot; value=&quot;&lt;a href=&amp;quot;<data:post.url/>&amp;quot;&gt;<data:post.title/>&lt;/a&gt;&quot; /&gt;&lt;/p&gt;&lt;p&gt;
&lt;label for=&quot;aa-forum&quot;&gt;Forum Link:&lt;/label&gt;&lt;br /&gt;
&lt;input size=&quot;80&quot; readonly=&quot;readonly&quot; onclick=&quot;this.focus();this.select();&quot; type=&quot;text&quot; id=&quot;aa-forum&quot; value=&quot;[url=<data:post.url/>]/<data:post.title/>[/url]&quot; /&gt;&lt;/p&gt;
<p align='center'><a href='http://www.arenamazza.org/' style='display:none;' target='_blank'>Widget by BloggerTipAndTrick</a></p>
&lt;/div&gt;<br/>
</b:if>
NOTE : Don't change anything in above code.
6.Save your template and you are done.

Sunday, September 16, 2012

How to Add Table to Blogger Blog Post


Currently it is not possible to add table in Blogger post through compose tab because blogger doesn't provide that option. If any one want to add table in blogger blog then it can be added by adding HTML code in HTML body of  Blog post.

How To Add Table To Blogger Post:-

How To Create A HTML Table

First of all we will create a HTML table and later used it with blogger. 

         <table border=1>
         <tr>
                   <th>Table heading 1</th>
                   <th>Table heading 2</th>
                    <th>Table heading 3</th>    
         </tr>

         <tr>
                   <td>Row 1 Data 1</td>
                   <td>Row 1 Data 2</td>
                   <td>Row 1 Data 3</td>
        </tr>
        <tr>
                   <td>Row 2 Data 1</td>
                   <td>Row 2 Data 2</td>
                   <td>Row 2 Data 3</td>
        </tr>
        </table>
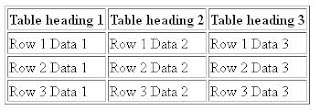
How to Add Table to Blogger Blog Post
As you can see through the HTML programming there are three <tr> tag which defines three rows of the table and <th> tag defines table heading wheres <td> defines table data of the table and border=1 defines the border width. Forth row may be easily inserted in it by adding the following code.
<table border=1>
         <tr>
                   <th>Table heading 1</th>
                   <th>Table heading 2</th>
                    <th>Table heading 3</th>    
         </tr>
         <tr>
                   <td>Row 1 Data 1</td>
                   <td>Row 1 Data 2</td>
                   <td>Row 1 Data 3</td>
        </tr>
        <tr>
                   <td>Row 2 Data 1</td>
                   <td>Row 2 Data 2</td>
                   <td>Row 2 Data 3</td>
        </tr>
        <tr>        
                   <td>Row 3 Data 1</td>
                   <td>Row 3 Data 2</td>
                   <td>Row 3 Data 3</td>
        </tr>
       </table>
How to Add Table to Blogger Blog Post

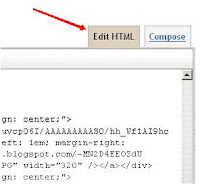
How to Add HTMl code to blogger Post:

  1. In blogger dashboard.
  2. Create a New post.
  3. And Paste the HTML code in Edit HTML page.
How to Add Table to Blogger Blog Post
So you seen that how easily one can easily add a table to post without any knowledge of HTML. If anyone find difficulty in placing the HTML code then comments are always open for that.